Extending the framework
How to extend the framework with plugin systemIntroduction
Extensibility is important especially for research and development of the renderers. In the typical workflow of the research on the rendering, we can enjoy the benefit of the extensiblity. For instance, we can use various predefined features such as materials, scene loading etc. to save our time by avoiding re-implemention and focusing on the implementation of the new features. Also, we can compare some variants of the implementation with the same configuations, e.g., we can use the same scene file with the same material configurations.
We designed and implemented the plugin system, which make it possible for the user of the framework to extend the features. With the plugin system, we can extend the most of the renderer components, e.g., rendering techniques, materials, mesh loading, or acceleration structure etc.
In terms of the design of the plugin system,
we mainly focus on the simpleness of the extension.
We can create a plugin with simple set of APIs and build commands.
We can build plugins with a portable header-only library without the need to static linking, so we don’t need to care about the compatibility of the plugins.
In order to create a plugin, we only need a .cpp file and single line of build command.
In addition to the usual plugins to extend the predefined features, our plugin system is capable of creating a new feature to be extended. For instance, you can even create a new assets which can be controlled from the scene configuration file.
Summary of features:
- Flexibility
- We can extend the most of the features of the renderer components.
- Simpleness
- The library for creating framework is portable library without the need to static linking.
- Meta-extension
- The system is capable of creating a new interface to let the user to extend new features.
Getting started
Prerequisite
Build environment
- Install binary distribution of the framework
- The binary distribution contains the necessary headers to create plugins
- Setup build environment
- Windows: Visual Studio 2015
- Mac OS X: Clang installed with latest Xcode
Required knowledge
- Knowledge on creating applications with C++ language
- Knowledge on rendering images with Lightmetrica
Implementing an existing interface
The binary distribution contains several example plugins.
Here we will try to create an plugin with texture_checker.cpp the in plugin directory.
The texture checher plugin implements texture interface which achieves simple generative texture with computation.
From here, we will describe the each lines of texture_checker.cpp.
 1 #include <lightmetrica/lightmetrica.h>
 2
 3 LM_NAMESPACE_BEGIN
 4
 5 class Texture_Checker final : public Texture
 6 {
 7 public:
 8
 9     LM_IMPL_CLASS(Texture_Checker, Texture);
10
11 public:
12
13     LM_IMPL_F(Load) = [this](const PropertyNode* prop, Assets*, const Primitive*) -> bool
14     {
15         scale_ = prop->ChildAs<Float>("scale", 100_f);
16         color1_ = prop->ChildAs<Vec3>("color1", Vec3(1_f, 0_f, 0_f));
17         color2_ = prop->ChildAs<Vec3>("color2", Vec3(1_f));
18         return true;
19     };
20
21     LM_IMPL_F(Evaluate) = [this](const Vec2& uv) -> Vec3
22     {
23         const int u = (int)(uv.x * scale_);
24         const int v = (int)(uv.y * scale_);
25         return (u + v) % 2 == 0 ? color1_ : color2_;
26     };
27
28 private:
29
30     Float scale_;
31     Vec3 color1_;
32     Vec3 color2_;
33
34 };
35
36 LM_COMPONENT_REGISTER_IMPL(Texture_Checker, "texture::checker")
37
38 LM_NAMESPACE_END
Description:
Line 1. In order to include necessary headers to create a plugin, we need to include
lightmetrica/lightmetrica.h. The header files are contained in the binary distribution.Line 5. In this example, we want to implement
textureinterface, so we create an class derived fromTextureclass. Marking the implementation class asfinalis a good habit to prevent further inheritance.Line 9. In order to implement an interface, we create a class with a set of predefined macros.
LM_IMPL_CLASSmacro takes three arguments: current class type, and base class type.Line 13, 21. In order to implement a texture, we need to implement at least two functions:
LoadandEvaluate(doc, source).Loadfunction loads parameters from scene configuration file. The parameters belowparamselements are contained inprop. Using the API to manipulate the properties (e.g.,ChildAs<T>, doc), we load three parameters:scale,color1, andcolor2.Evaluatefunction evaluates the texture color given the uv coordinate of the texture. Here we implemented a logic to generate checker figure.Line 36. The implementation class must be registered to the framework by
LM_COMPONENT_REGISTER_IMPLmacro. The macro takes two parameters: the type of the implementation class, and the identifier of the implementation. The identifier must be<Interface ID>::<Implementation ID>format.
Building a plugin
Now we try to build texture_checker.cpp as a plugin.
Buling a plugin is extremely easy.
We don’t need to use any static library to build a plugin.


Launch Visual Studio 2015, press
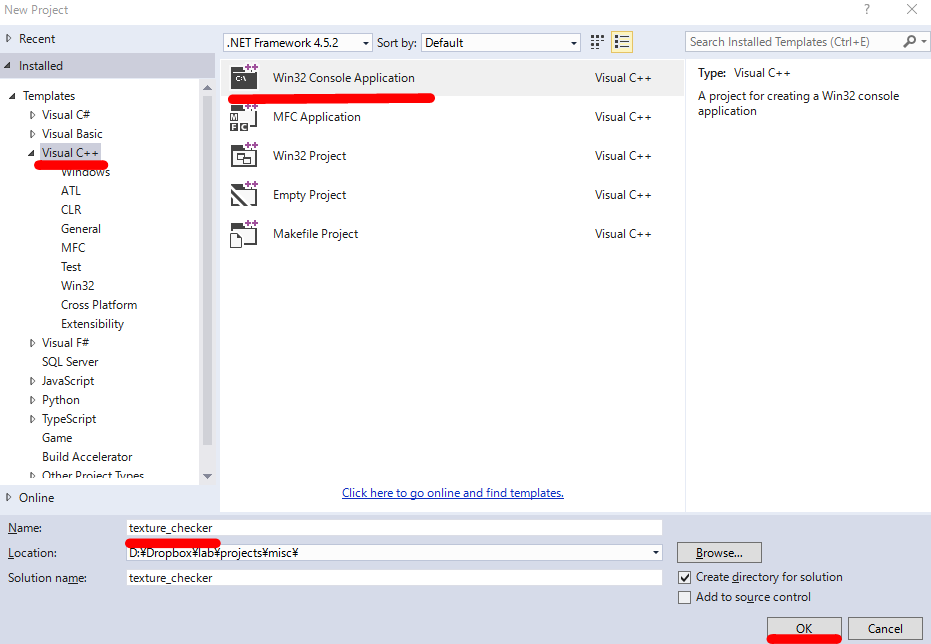
File > New > ProjectSelect
Templates > Visual C++andWin32 Console Application, change project name and location and press OK, here we createdtexture_checkerprojectPress
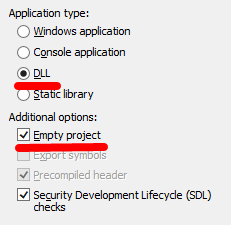
Next, selectDLLin Application type, enableEmpty projectin Addtional options, and press FinishChange Solution Platform to
x64, change Solution Configuration toReleasePress
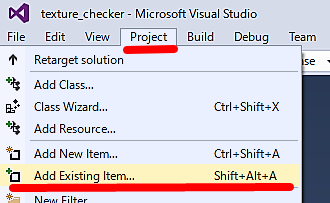
Project > Add Existing Items..., and addtexture_checker.cppPress
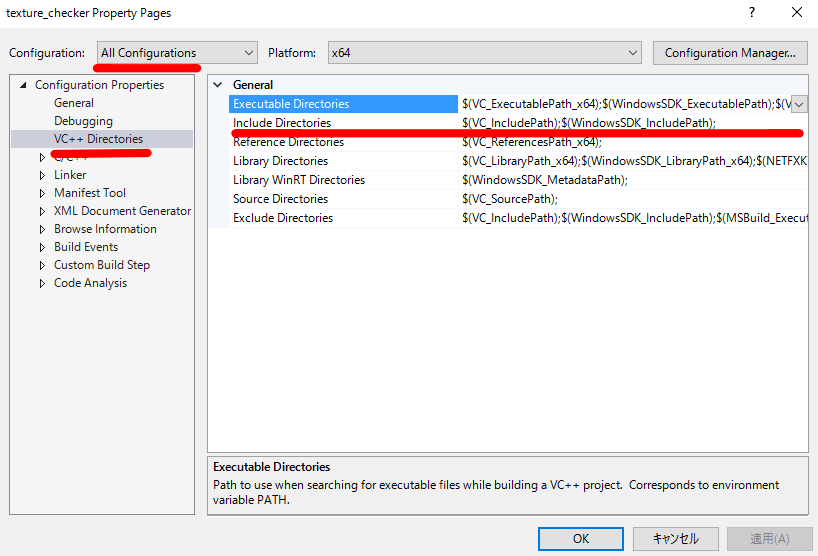
Project > texture_checker Properties..., change Configuration toAll ConfigurationsSelect
Configuration Properties > VC++ Directories, pressEdits...for Include Directories, and addincludedirectory included in the binary distribution.Press
Build > Build Solutionthentexture_checker.dllis generatedCopy
texture_checker.dlltobin/plugindirectory in the binary distribution
Open command prompt and change directory to the
bin/plugindirectory of the binary distributionLoad build environment
"C:\Program Files (x86)\Microsoft Visual Studio 14.0\VC\vcvarsall" x86_amd64Build the plugin
cl /LD /EHsc "../../texture_test.cpp" /I"../../include" /link /out:texture_checker.dll
Open terminal and change directory to the
bin/plugindirectory of the binary distributionBuild the plugin
clang++ -dynamiclib -std=c++1y -march=native -I"../../include/" "../../plugin/texture_checker.cpp" -o texture_checker.dylib
Running renderer with plugins
Now we built the texture checker plugin.
The plugins in plugin directory same as the executable lightmetrica are automatically loaded.
We are ready to render the scene with the plugin, by just copying the plugin into the plugin directory.
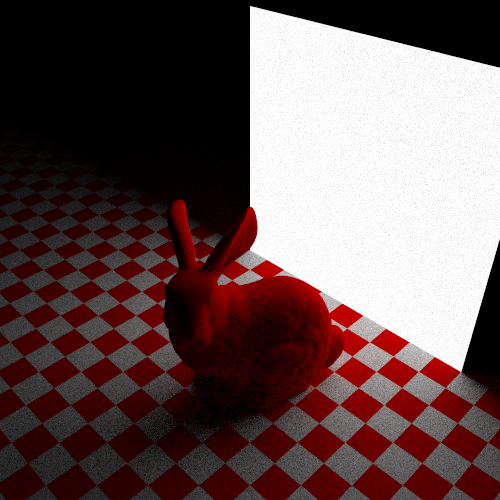
As an example scene,
we prepared the modified version of the 001_bunny scene as scene_ex.yml.
The difference between scene.yml is the following highlighted lines.
We created a new bsdf asset which utilizes texture asset named tex_checker.
In the definition of tex_checker asset, we specify the new type of the asset checker. Likewise, we can control the configuration of the plugins from the scene file.

original scene
w/ texture checker plugin
assets:
    ...
    bsdf_checker:
      interface: bsdf
      type: diffuse
      params:
        TexR: tex_checker

    tex_checker:
      interface: texture
      type: checker
      params:
        scale: 100
        color1: 1 0 0
        color2: 1 1 1

scene:
    ...
    nodes:
      - id: n4
        ...
        bsdf: bsdf_checker
Assuming we are in the same directory as lightmetrica executable, we can obtain the rendered image with the following command.
If we can successfully render the image, we can obtain the image in the right figure.
$ ./lightmetrica render -s ../example/001_bunny/scene_ex.yml
Design
All plugins must be implemented with C++ language.
We can create a plugin by implementing a interface offered as a C++ class.
For instance, if we want to create a plugin for texture, we need to derive and implement Texture class.
We call the class to be implemented as interface (Texture class in the example). And the derived body of the plugin as implementation.
Interface
The interface is the class (or struct) that
is defined by some combination of macros.
The interface class must begin with LM_INTERFACE_CLASS macro
supplying the interface type and the interface class type.
The member functions are defined by LM_INTERFACE_F macro
with the name of the function and the function signature.
Currently we don’t support overloading and const member functions.
For instance, the interface A with a single function Func1 and Func2 can be defined as following lines.
Note that the interface A has no base interface. In this case, we need to specify Component class as the base class.
struct A : public Component
{
    LM_INTERFACE_CLASS(A, Component, 2);
    LM_INTERFACE_F(0, Func1, void());
    LM_INTERFACE_F(1, Func2, int(int, int));
};
Also we can create the interface with inheritances.
struct B : public A
{
    LM_INTERFACE_CLASS(B, A, 1);
    LM_INTERFACE_F(0, Func3, int());
};
Implementation
Also, the implementation of the interface is defined by the combination
of predefined macros. For instance, an implementation of the interface A could be
struct A_Impl : public A
{
    LM_IMPL_CLASS(A_Impl, A);
    LM_IMPL_F(Func) = [this]() -> void { ... }
};

LM_COMPONENT_REGISTER_IMPL(A_Impl, "a::impl");
The class must begin with LM_IMPL_CLASS macro.
The implementation of the interface functions must be defined LM_IMPL_F macro
assigning the actual implemetation as a lambda function.
Finally we need to register the implementation to the factory class
with LM_COMPONENT_REGISTER_IMPL macro with a key string (in this example, a::impl).
The key is later utilized as a key to create an instance of the implementation.
Creating instances
Once we created the interface class and its implementation,
we are ready for creating an instance of the implementation.
The instance creation is managed by a factory class ComponentFactory.
For instance, asssuming the interface A is defined in the header a.h, we can create an instance of A_Impl with the factory function ComponentFactory::Create as
#include "a.h"
...
const auto a = ComponentFactory::Create<A>("a::impl");
...
The factory function returns unique_ptr of the interface type.
Note that we need careful handling of memory allocation/deallocation between boundaries
of dynamic libraries. The function automatically registers proper deleter function
for the instance created in the different libraries.
The overall design of the Lightmetrica follows the design pattern known as
the dependency injection (DI), which make is possible to decouple the dependencies between classes.
In particular, the all extensibule classes and its functions are accessed via interfaces.
In C++, the class with all member functions are pure virtual member functions with =0.
All instantiation of interfaces are controlled via ComponentFactory factory class.
So we no longer need to create header files for the implementation class.